Although the 1st Canadian Army, holding the Granby Line, had been forced to withdraw to Montreal (see previous game), intelligence in Montreal (D5) was informed that the 2nd Army of New York had suffered heavy losses, and would require some time to reform and build up their strength. Empire Command decided to inspect the Granby survivors, and three battalions (D4-6) were willing to immediately move off to support the western defences (the St-Eugene Line) to oppose the American Main Army. Dice were thrown to determine whether they would arrive there before the American assault. Scoring a D3, compared to a D6, they arrived in good time........ General Gordon embraced the Canadian commander on their most opportune arrival.
So what of the Americans. Their command had also been informed on the action at Granby (D6), that a headlong rush towards Montreal by their Main Army was no longer required. Instead, they informed other garrisons to furnish additional troops and artillery. The new plan was to bombard the St-Eugene Line into submission. This would also allow the 2nd Army of New York time to reconstitute itself.
Reinforcements Arrive!
The response to the Main Army was quick and efficient. By utilising the canal systems joining the Great Lakes, merchant shipping ferried three military units from Detroit, and one from Buffalo, NY, to Ottawa in record time.
The American garrison in Ottawa had already prepared to move their siege guns, in preparation for Montreal, now they would form part of the 'Liberty Line' (entrenchments being raised opposite the St.Eugene Line).
Reinforcements arrive!
The American delay in attacking the St.Eugene Line had allowed a naval vessel to arrive from Quebec (D4). It now disembarked a naval landing party and gun, That city was unable to send further reinforcements as its garrison only comprised two more military units, and some armed civilians, but the extra gun was most welcome.
STATE OF THE LINES The Liberty Line. Fifteen military units including the Signals Corps. Four siege guns, three field guns. Note, field guns are not in range. Also, two of the siege guns are actually howitzers, so any redoubt casualties cannot claim saving throws for hard cover!
The St.Eugene Line. Ten military units, including 3 siege, 3 field guns. By mutual agreement. The civilian population, and their livestock, were granted leave to vacate the area.
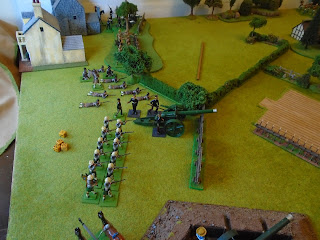
THE BOMBARDMENT BEGINS
MOVES ONE to FOUR. At 10.15am the American guns opened up. The Empire guns replied. Both sides sought to silence their opponents siege guns. RESULTS Six Empire artillerymen lost, the survivors hold their position. The Americans lost one of their howitzers, and three gunners. Also one infantryman.
MOVE FIVE. The artillery duel ceases, both sides reorganise their artillery crews. Dice are thrown to see who launches a raid. An American battalion. MOVE SIX, a Canadian unit does likewise. MOVE SEVEN-EIGHT. The artillery begin again, the Empire guns are slowly being silenced due to casualties, then the routing begins. By MOVE NINE, General Gordon orders a full retreat, the game is over. They must save what ever they can. MOVE TEN, the American army begins to advance towards the now deserted St.Eugene Line.
LOSSES
RN Landing Party and Gun -2 13 routing
RN Battery -7 1 routing
RCA Gun -2 2 routing
Highland Battn. 12 routing (just very bad dice!)
Three guns captured.
US Howitzer Battery -2 one gun destroyed
US Siege Gun -2
Mass. NG Battn. -1
This was nothing like how I expected it to play, but siege artillery will dominate, and the campaign required it to be played. Fortunately, for the Empire, only one military unit is fully lost. I guess the Americans will now be moving on to Montreal! MGB
FOOTNOTE, additional skirmish game
The hasty withdrawal from the St.Eugene Line seemed a bit of an anti-climax. So, to assist in their safe withdrawal, I decided to play a delaying tactic involving the unscratched Royal Artillery battery of medium guns. Their objective, further down the road, was to delay the American army pursuing Gen.Gordon's. These guns have a range of 36inches. This skirmish was more fun to play than the previous battle! I hope my notes give some insight into the flow of the game.

MOVE ONE The battery opened up on the approaching army at 36". A D6 was a direct hit on the cavalry, a D4 was slightly to the left, another hit. The cavalry were now at half strength and obliged to test their morale. D1, and with factors including artillery fire and half strength, they rout. Morale tests now on neighbouring units 6" away of similar class. The skirmishers to the right (D1) also rout. The battalion behind the cavalry throw a D2, they hold but refuse to advance (but at least they didn't rout!). The skirmishers on the left of the cavalry throw a D1, and they scatter. This forces a morale test on another skirmishing unit to their left. D2, no movement forward.
MOVE TWO The battery fires again. D6 is a hit, D3 is slightly to their left and is also a hit on another unit. American General moves to rally one of the routing units, he will lose the other as they move off the table. He saves one, they form up but refuse to advance.
MOVE THREE The guns fire, D6, and a D4, the latter hits open ground as the unit was in column and had a narrow frontage.
MOVE FOUR The guns fire, D6 (again), and a D3, a miss. American General has another morale test and they still decline to advance (D2).
MOVE FIVE The guns fire, D4 and D1, both miss. American General convinces a regiment to fully obey their orders.
MOVE SIX The guns are limbered up and they about face. Two American units are only 18" away.
MOVE SEVEN The guns leave the table.
CASUALTIES
NG Battn, 8 refuse to advance
US Marines 12
US Infantry 12 -3
US Infantry 12 -1 also refuse to advance
NG Skirmishers 12 routed
US Infantry 12 routed, rallied
US Cavalry 4 -2 two routed
That was fun, and made a better conclusion!
MGB


Smashing battle report ! , looks a fun game to play - have you thought of putting your rules on your blog they seem very interesting and I'm sure people would be interested .
ReplyDeleteHi Tony, it will happen by default as the scenarios are occasionally explained, as above. They really are extremely basic! Anyone could compile something so simplistic.
DeleteMichael
Oh dear. At least everyone looked good!
ReplyDeleteRoss, the dice and rules decide the outcome, but the rearguard skirmish will at least secure a safe withdrawal to Montreal!
DeleteMichael
Ahh, I'd forgotten ( despite having just read it at the top of the last post) that Ottawa was the base for the second force. Ottawa is west of Montreal and the Ottawa River joins the St. Lawrence at the west end of Montreal so I didn't give it any thought despite it being the obvious route for a forced based near Ottawa, just figured the southern attack was coming the traditional way, up from NY along the St Lawrence or Richelieu, not by back roads. My bad, too busy looking at the pictures!
ReplyDeleteRather shocking result though! The garrison might have been better off staying home and defending the island. Not much worth defending in between!
Hi Ross, the American plan was to approach Montreal from two directions, to frighten the outnumbered garrison. My fault, I should change the 'southern' for western, you would know better than I. (Will do that now!). Empire Command felt it would not be possible to defend Montreal at every point, being so outnumbered. And they didn't want siege guns bombarding the city, with its large civilian population. Actually, their numbers are still quite good, and I can confirm that a relief force is being mustered in Halifax, about to sail for Quebec.
DeleteMichael
If it helps, the west end and north of the island was mostly farmland at the time. To bombard it they will have to cross the St.Lawrence and march across the then boggy ground on the south shore, (know as Mouille Pieds (wet feet) by the Quebecois earlier, and where my parents house was built post WWII) to the town, later City of St. Lambert where the only bridge across the river was, a fairly new 3 km long railway bridge named after Queen Victoria, the longest bridge in the world when it was originally opened. Some boats might be hand to do some island hopping avoiding the rapids, possibly around the north side.
DeleteAt least its not winter! If approached from the right angle, freedom of language and religion etc, they might even be able to recruit some Quebecois volunteers.... the 1837 rebellion was within living memory...
Still an exciting campaign!
Cheers Ross, for your advice. I have been looking at the Island of Montreal & Ile Jesus c.1885 as one entity for game purposes.This gives us four pre-1900 bridges, mainly for railways. (Have excluded the 3-4 bridges joining the Ile Jesus to Montreal.) Otherwise, the Americans must use boats, as you have mentioned. Have already distributed the 12 Empire military units. The seventeen American military units have also been distributed.
DeleteBy this method, I can subdivide the siege into separate actions. For example, Victoria bridge is defended by three Empire units and some armed volunteers, while the Americans have six military units facing them.. The Saint-Laurent bridge also has three Empire units and some armed volunteers, against five American military units. I think this system is viable. But do remember, I might just seek to starve the entire garrison into surrender, so dice may decide the outcome, particularly if some of the civilian population are anti-Empire too. (Although the USA ruling class were no friends of the Roman church, at that time, and the higher clergy would have known this.
Michael
It all sound like good fun.
DeleteA most excellent sequel to your first battle Michael! Quite an artillery duel, it was very exciting! Your table looked beautiful and the action was thrilling from the start to finish!
ReplyDeleteThank you Brad, I really do prefer using my 54mm for gaming, and having linked the 1870-1910 figures to a campaign, it has added so much more to the strategy, both on and off the gaming table. Truly, chess with a thousand pieces. Now add to that the gloss finish, and nostalgia.............. perfection.
DeleteMichael
Mr Wells would have been right at home with this game - just superb, Michael. A great looking table and a surprising result always make for a fun campaign. My favourite piece is still your tractor it's looks right at home on there. I know I keep saying it, but simply superb, Sir.
ReplyDeleteThanks very much, Paul. I'm glad my ramblings are of some interest to others. Yes, I was very lucky picking it up. They aren't that expensive in the US, but quite rare in the UK. I was able to get it for £15.20 delivered, so not cheap. But it was in perfect condition, and no regrets.
DeleteMichael
By the way, Paul. That tractor driver is one of your home-cast figures...... perfect!
DeleteMichael